Mitred (Mitered) Granny Square Continuous Blanket (or Small Motif)
How to Crochet a Continuous Mitred (Mitered) Granny Square Blanket - adapting the standard small motif
To learn how to crochet a standard small Mitred Granny Square, please see this video or scroll down for the written pattern:
WRITTEN PATTERN for small motif: USA STITCH TERMS
ch = chain
dc = double crochet
ss = slip stitch
sp = space
Repeat the pattern between the * * X amount of times
(You can use whatever method you prefer for your grannies, be it chain 2 in the corners, ch1 on the sides etc OR follow my instructions below)
Round 1 & 2 are normal granny square rounds, then from Row 3 onwards you will be working in back and forth rows
Round 1: (in cream)
Into a Magic Ring, ch3 (counts as 1st dc) 2dc
*ch3, 3dc* x 3
ch3, join with ss to initial ch3 of the round. Then ss under next 2dc and into ch3 sp.
Round 2:
Ch3 (counts as 1st dc) 2dc, ch3, 3dc
*3dc, ch3, 3dc * in remaining three ch3 corner spaces from round below
Join with ss to initial ch3 of the round, fasten off cream.
Row 3: (in pink)
Join pink to any ch3 corner sp from round below.
Ch3 (counts as 1st dc) 2dc
3dc in next sp between granny clusters
3dc, ch3, 3dc in next ch3 sp (corner formed)
3dc in next sp between granny clusters
End with 3dc into ch3 sp from round below.
Row 4:
ch3 (counts as dc) and TURN YOUR WORK
*3dc * in sp between granny clusters from round below until you reach the corner sp
3dc, ch3, 3dc in ch3 corner sp from round below (corner formed)
*3dc * in sp between granny clusters from round below, ending on 1dc into the top of the ch3 from round below. Fasten off pink.
Row 5: (in grey) - TURN YOUR WORK and join new colour inbetween final dc of the row and 1st granny cluster
REPEAT ROW 3 - one more granny cluster will be added along the sides
Row 6:
REPEAT ROW 4 - one more granny cluster will be added along the sides
Row 7: (in sage) - TURN YOUR WORK and join new colour inbetween final dc of the row and 1st granny cluster
REPEAT ROW 3 - one more granny cluster will be added along the sides
Row 8:
REPEAT ROW 4 - one more granny cluster will be added along the sides
Round 9: (in cream) SQUARING OFF ROUND - now working around the full square instead of back and forth rows
With the front of your work facing you, join cream inbetween final dc of the row and 1st granny cluster.
ch3 (counts as dc) 2dc, ch3, 3dc all into same sp (corner formed)
*3dc * in sp between granny clusters from row below until you reach the corner sp
3dc, ch3, 3dc in ch3 corner sp from row below (corner formed)
*3dc * in sp between granny clusters from row below until you reach the sp inbetween last granny cluster and final dc of the side.
3dc, ch3, 3dc in sp inbetween last granny cluster and final dc of the side. (corner formed)
*3dc * around the dc / ch3 turning ch of each round, beneath the full granny clusters (please see video) until you reach your original 2 round granny square from the beginning where upon place your *3dc * in the corner sp (there will be 3dc in pink already in this sp) and into the sp between the granny clusters.
In the ch3 corner sp of your starting granny square, form a corner with *3dc, ch3, 3dc* (corner formed)
3dc into sp between granny clusters, 3dc into ch3 corner space where you joined the pink
Then *3dc * around the dc / ch3 turning ch of each round, beneath the full granny clusters.
Join with ss to initial ch3, fasten off cream - weave in all your ends.

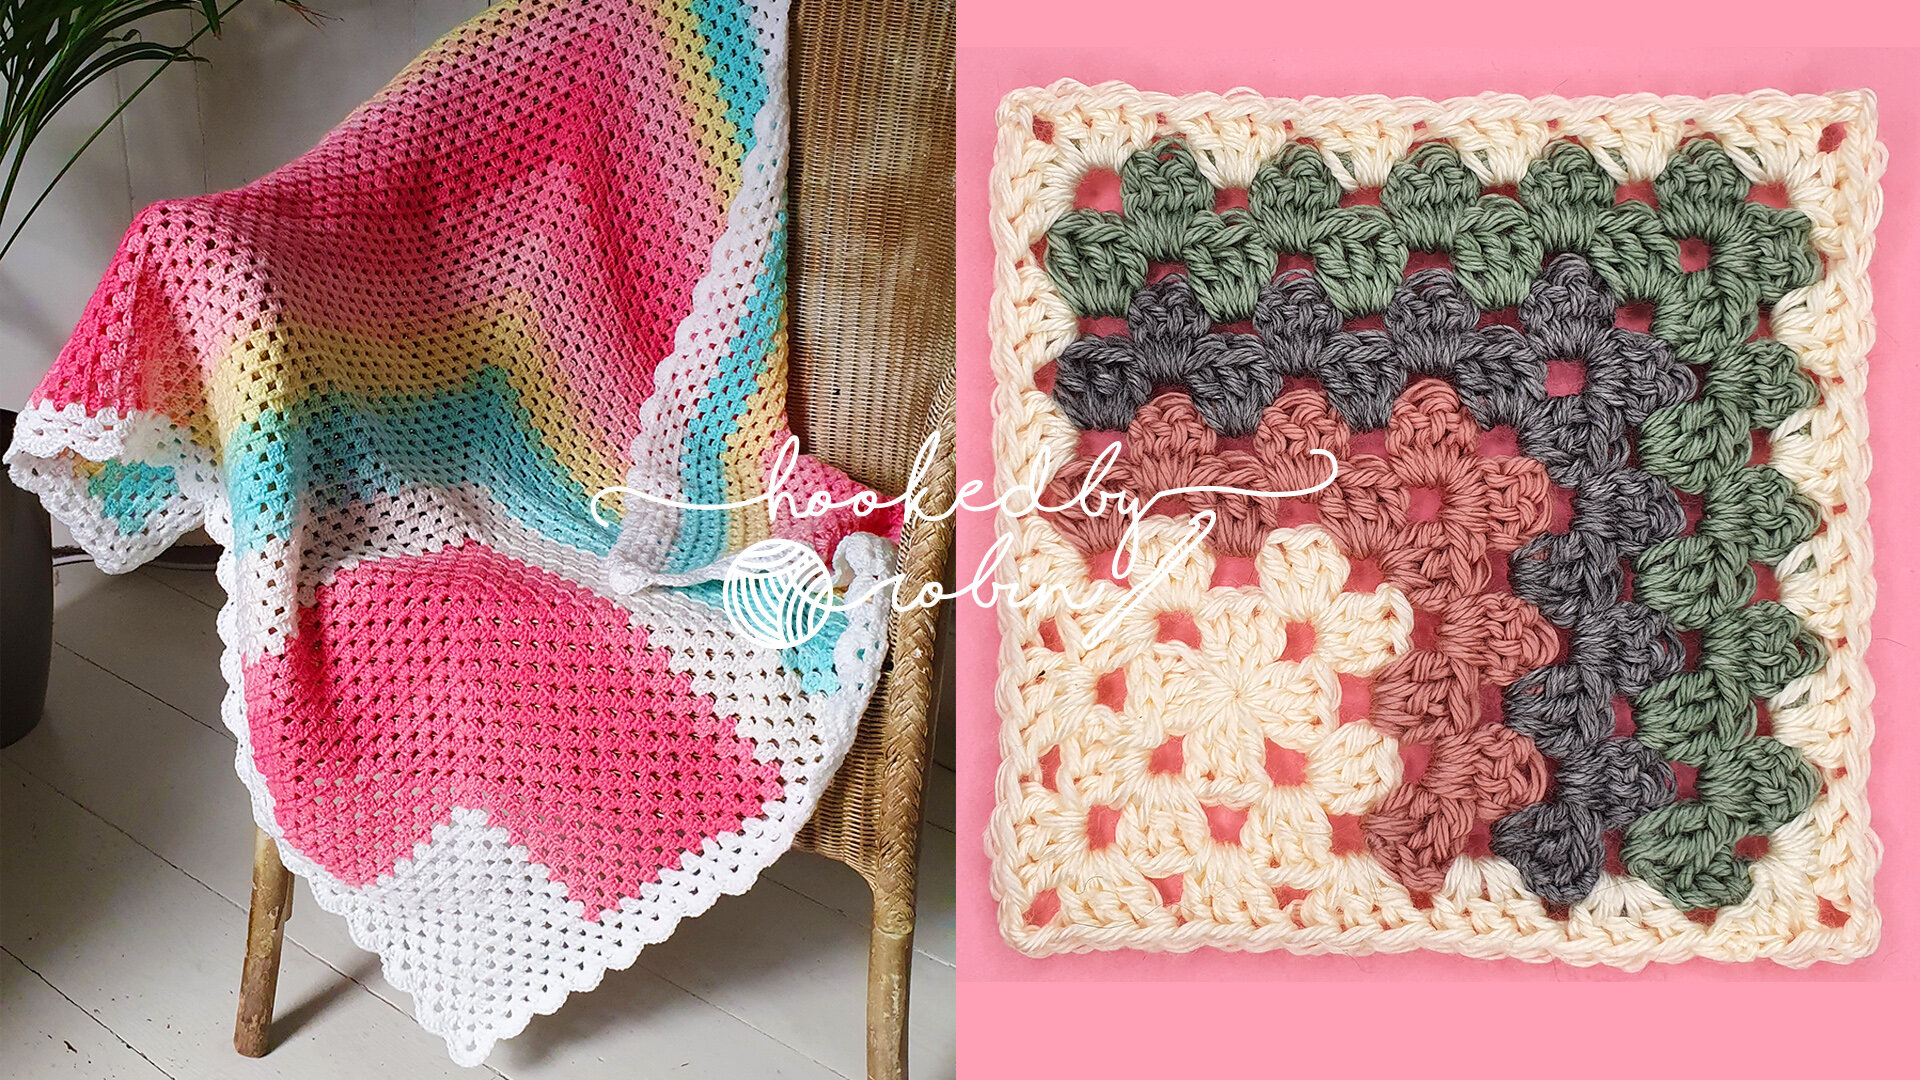
Yarn used for large baby blanket (continuous large Mitred Granny blanket)
4mm Hook
2 x Balls of Sirdar Pattercake in colourway Candy Cane https://bit.ly/38zzjtS
1 x Scheepjes Colour Crafter in white https://bit.ly/2tAsWrp
To make my large baby blanket, I started with a 10 round granny square using the Scheepjes Colour Crafter in white.
I then used just under 2 Pattercakes to crochet the mitred section (Rounds 3 & 4 in the video) until I was almost out of yarn. I then joined the Scheepjes Colour Crafter in white to do the final squaring off round.
I did 3 granny rounds in total (including the final squaring off round) for the border (using the Scheepjes Colour Crafter) and then ended with a pretty shell scalloped edge.

If you spot any errors in the written pattern please shout! I'd love to see any projects that you make - please tag me on Facebook or Instagram (or use the hashtag #hookedbyrobin)
Happy Crocheting!
Robin x
*Disclosure: some of the links posted below are affiliate links which means that, at no additional cost to you, I will earn a small commission if you click through and make a purchase. This helps me to keep my content free :-) Thank you! *